Thursday, March 29, 2012

How to go from tangled to NOT - Retrofitting your Horizontal Blinds

Do you have horizontal blinds where the cords are just a tangled mess?
Do you cords hang all over the place and dangle far below your window sill?

Here is how to fix this problem and eye sore.

First you will need to contact your blind supplier and order an extra tassel for each blind you will be fixing. You will need the following items: Scissors, Needle (or something similar), Drill (optional) and the existing tassels that are on your blind (plus one new one, per blind).

(Click on any of the images for a closer view)

STEP ONE
 
Lower your blind completely so the bottom rail is touching the window sill. This step is very important so that you do not end up cutting the lift cords too short.
Photo 1: Blinds are raised. Photo 2: Blinds are lowered.

STEP TWO
  
Untangle your cords and untangle any knots that may exist. You want to use as much of the existing cords as possible so you defiantly do not want to cut above any existing knots that were created due to tangling or done on purpose to reduce existing tangling.
Photo 1: Cords are knotted. Photo 2: Cords are tangled. Photo 3: Cords have been unknotted and detangled.

STEP THREE
 
Once you have untangled your cords you will need to extract the cords from the inside of the tassel. Use a needle or something thin to push the cords through the tassels until the knotted cords are exposed.
Photo 1: Pushing cords through with needle. Photo 2: Cords have been extracted from tassel. 

STEP FOUR
     
Once you have the cords pulled through carefully cut the existing knotted ends. Be careful not to cut too much off. Now you can remove the existing tassels. Place these aside for just a minute. We will want to reuse them shortly. You are now left with four loose cords.
Photo 1: About to cut the knots off the cords. Photo 2: Cutting the knots off. Photo 3: Tassels have been removed.

STEP FIVE
 
Take your new tassel that you ordered from your window blind supplier, or contact us at Adanac Blinds & Window Treatments, to obtain some. You will most likely need to carefully increase the hole size in the tassel. You can do this by using the ends of your scissors, if they are narrow enough or you can use a drill bit and carefully drill a very slightly larger hole to accommodate the four cords. Be careful to not make the hole too large.

The tassels are usually drilled to accommodate two cords only. If you use scissors, you will have to scrape via the exterior side of the tassel, as shown above, as well as inside the tassle, from the other end, so that the hole is increased all the way through.
Photo 1: Enlarging cord hole in the tassel so four cords can pass through. 

STEP SIX
    
Feed all four cords through the tassel as shown above. You may need to use a slight twisting action as you feed them through if your hole is a little tight.
Photo 1: Inserting all four cords into the tassel using a twisting motion until they passed through. Photo 2: All four cords through the tassel.

STEP SEVEN
     
Now that your cords are threaded through your tassel, grab two (of the 4) cords. Tie a knot in these two cords where you would like your tassel to sit. I tend to use the third slat from the top as a gauge.
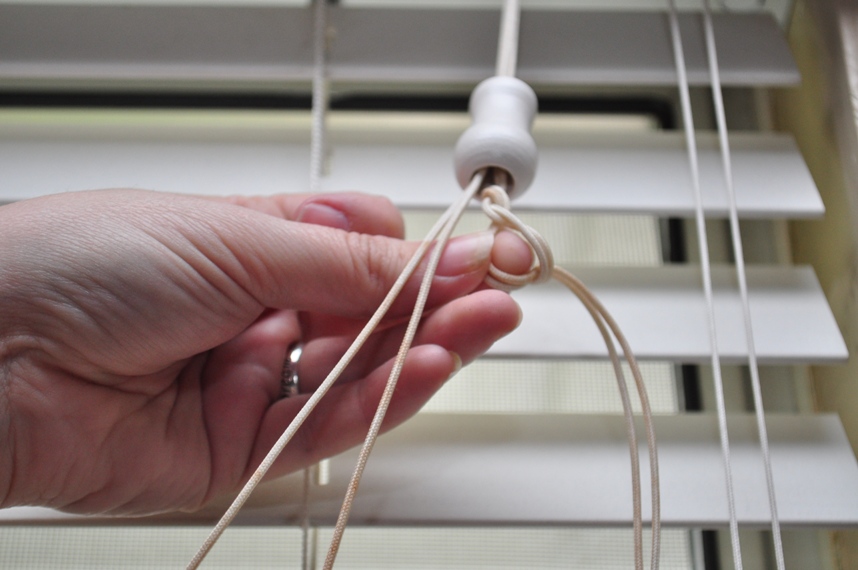
Photo 1: Tieing a knot in two of the four cords. Photo 2: Result of the two tied cords.
    
Now take all four cords and tie them all into a knot. We do this for extra support as we are about to cut the two cords that we just tied.
Photo 1: About to tie all four cords together for extra strength. Photo 2: All four cords tied.
PS. As a trick, tie a knot at the bottom of the two cords you knotted so that after you tie all four you will know what two to cut.

STEP EIGHT
  
Carefully cut the two strings that you originally knotted. If you tied those two at the bottom they will be easy to identify. Then pull the knot into the tassel. You may need to push the knot through as it will be a large knot at this point.
Photo 1: Cutting the two cords. Photo 2: The result.

STEP NINE
      
Retie the tassels at the end of the cords, using the tassels that you removed earlier. Sometimes the manufacture doesn’t tie them very equal. This is your chance to make your cords look as pretty as they can be. Line up your knots so that the tassels lay evenly beside one another.

(While you’re at it, you can do the same thing with your tilt cords. Have them either line up sided by side while they are in either the closed position or the open position, you decide. See the pictures below to see what we mean. We chose to have them all lay equal when the blind is open.)
Photo 1: Thread cord through tassel. Photo 2: Tie a knot at end of cord. Photo 3: Originally the cords where uneven lengths. Photo 4: Corrected cord lengths so they were even, for a nicer finish.

CHILD SAFETY REMINDER
    
If you have young children or pets in the house make sure you practice safety. Life can get busy and it’s hard to remember everything so we at Adanac Blinds have made “Safety Reminder Cling Stickers” that you can apply to your window to remind you to tie up your cords when you draw (pull) up your blinds. Don’t leave cords dangling below the sill, on the floor or in reach of children.

Hidden behind the blind but exposed when you lift your blind up, you will see your reminder sticker to tie up those cords. Please contact us to obtain your reminder cling stickers Today!
Photo 1: Window Cling Sticker with Reminder to "Tie Up Cords". Photo 2: The sticker, exposed, when you lift your blind up. Sticker is revealed to remind you to tie up your cords, out of reach of children.
 
To tie up your cords you can purchase cleats (see images below) that you just mount beside your window blind. You can purchase these from your local hardware store or from your window blind supplier.
Photo 1: An example of a cleat. Photo 2: How the cleat is used.
 
THE FINISHED PRODUCT
Boy do they look so much cleaner than they did before. Less clutter and fewer tangles! Enjoy your blinds even more with these few easy steps.
Photo 1: The new clean look. Photo 2: Close up of even cords (left two are the pull cords, the ones we modified. The two on the right are the tilt cords which we just evened out the lengths on for a clean and even look).


Disclaimer: Please check with your blind supplier to ensure this retrofit will not void your warranty before performing these steps. Adanac Blinds & Window Treatments is not liable for any damage, repair or void of warranty by performing these steps.

Wednesday, March 28, 2012

Vertical Blinds are a thing of the PAST... if you want alternatives that is!


TO VERTICAL OR NOT TO VERTICAL YOUR PATIO DOOR?

Many people cringe at the traditional vertical now a days, but some also still very content with them. If you are one who can not stand the traditional vertical blind for patio doors here are a few alternative ideas.

1) Panel tracks. Depending on the manufacturer they may be referred to as: Panel Drapes, Panel Blinds, Panel Tracks.

2) Vertical Cellular blinds. Depending on the manufacturer they may be referred to as: Sliding Cellular Shades, Longitude Cellulars, Vertiglide Honeycombs, Vertical Cellular Shades... just to name a few.

3) Traditional [Horizontal] Cellular blinds. We recommend using 2 shades in a patio door.

4) Roller Shades. We recommend using 2 shades in a patio door, however, 1 shade spanning the entire width of your door will work as well.

5) Pleated Shades.  We recommend using 2 shades in a patio door.

6) Sheer Drape / PVC Vertical combo. This a great alternative at hiding the fact that you are using a vertical blind. While in the open position it looks like all you have is a Sheer Drape, you can't see the vertical vanes BUT in the closed position you have the benefit of room darkening as you would if you had the traditional PVC Vertical blind. Depending on the manufacturer they may be referred to as: Privacy Sheers, Sheer Vertical Wraps... just to name a couple.

Although almost any shade could be used, there are certain characteristics to be mindful of. If you choose Roman Shades or Faux / Real Wood Horizontals you need to consider the thickness of the stack when the blind is drawn completely up. These types of blinds have thick stacks and should be mounted as an outside mount and high above, between the top of the door frame and the ceiling, to avoid head on collisions when walking back and fourth through the door opening. You will need to make sure you have this space available for this mounting type.

*The photo shown above is Habitat Blinds & Shading Systems' Footprint Longitude Celluar Shade. For more photos visit us online at www.adanacblinds.ca or on our Facebook at www.facebook.com/AdanacBlinds... and don't forget to "Like" us on Facebook to stay connected with new ideas and promotions.

Thursday, March 22, 2012

HAPPY EASTER!!! - Kids Colouring Contest


The winner will be announced at the end of April (via Facebook, our Blog and on YouTube) and will receive an activity pass to Koko's Activity Center in Port Moody.


If you have any difficulties with the colouring pages please email us and we will email them to you or click the link below the image. They should print out in high quality on a full page.

RULES: Kids must be 12 years of age and younger to enter this contest (ages 4 Months to 12 Years). The child must reside within the Lower Mainland of Vancouver. The contest starts now and runs til April 15, 2012. Choose one of the two pages to colour and submit. 
Please email the art work to customerservice@adanacblinds.ca or email for mailing address if you wish to send it by post.
 If you mail it please allow yourself a few days for the mail to arrive to us on time. One entry per child. Please provide child's name and age, email and contact information. Please "LIKE" our facebook page so you will receive our announcements and reminders of each months contest at https://www.facebook.com/AdanacBlinds.


Enter our Easter Colouring Contest and WIN a pass to Koko's Kids Activity Center.
1) Visit our blog post and choose the 1 of 2 colouring pages you want to colour. http://adanacblinds.blogspot.ca/2012/03/happy-easter.html
2) Colour your page
3) Include your name and age on front of the colouring page.
4) On the back include your contact information... phone number & email address you can be contacted at.
5) Send us your art work before April 15th by email or by canada post. For daycares, in the Tri-Cities or Maple Ridge area, I can swing by and pick them up.
6) We will draw for the prize and announce the winner by the end of April. Watch for our announcement on Facebook/Twitter, on YouTube &/or on our Blog. We will also congratulate you in our next months newsletter so be sure to sign up for our newsletter too!!
7) We will mail or drop off your prize package to you. Your prize package will include your Koko's pass and a few extra goodies!


Facebook: /AdanacBlinds
Twitter: @AdanacBlinds
Blog: adanacblinds.blogspot.ca
YouTube: AdanacBlinds
Mailing List: customerservice@adanacblinds.ca

PLEASE FEEL FREE TO SHARE THIS WITH YOUR FRIENDS!!Disclaimer: Permission to use these pages was given to us by http://www.coloring-page.net as of March 2012.